
< Previous Next >
How To Safely and Easily Claim Bitcoin Gold + Almost Any Other Forks
How To Safely and Easily Claim Bitcoin Gold + Almost Any Other Forks
DISCLAIMER: None of the following is intended to be investment advice. This is only meant to be a description of what has worked well for me so far, and my own opinions. Also, full disclosure, my links to Coinbase and Binance include referrals. It actually benefits you to use them because we will both get an extra $10 worth of BTC for free if you deposit at least $100 to Coinbase. Thanks in advance if you follow the links when you make your accounts - and even if you don’t, I hope you find this article useful! Remember: Always do your own research. This is not financial advice, so do not make any purchases or sales based on the opinions written on this website.
Hello! Today I am going to talk about Bitcoin forks and how they can put some free money in your pocket. There have already been several forks, and there are more coming - this guide will show you how to get access to any Bitcoin fork and it will also show you how to sell forked coins for fiat money or other cryptocurrencies if you are so inclined. Something that really bothers me about Bitcoin forks is that they’re often considered esoteric - something your average person in crypto doesn’t want to touch until a very stable ecosystem has evolved for that particular coin. “I have my Bitcoin, so who cares?” they might think. Wrong! If you have Bitcoin before a fork, you are often literally throwing away free money if you don’t claim the forked coin.
With that said, I get where people are coming from. Forks can be scary. Some are extra dubious - Bitcoin Diamond, for instance, seems to be a total scam/hoax rather than a real fork. Another example is Bitcoin Gold - few people seem to care about it, and I suspect the only reason many haven’t dumped it on an exchange is because they don’t think it’s easy or safe to do. I don’t blame them - I’ve read that the Bitcoin Gold dev team inadvertently linked to malware/scams/etc. at least twice on their official Twitter and/or website. Obviously no one wants to get scammed, so it’s no wonder a lot of people aren’t touching it.
Wait, Hold On - Just What is a “Fork”?
A blockchain is a public ledger, like a notebook full of transactions that everyone can see. Think of a “fork” as a taking that notebook and copying it up to a certain point. For the visually inclined, here is a graph:

To put it in laymen’s terms, if you owned 5 Bitcoin before the Bitcoin Cash fork, you now own 5 Bitcoin and you also own 5 Bitcoin Cash. Later, the Bitcoin chain forked again to create Bitcoin Gold, so if you owned 5 Bitcoin at the time of this fork, you’d now own 5 Bitcoin and 5 Bitcoin Gold. This is not necessarily always the exact math - a fork called Bitcore (BTX), for instance, cut the numbers in half so that if you had 12 bitcoins at the time of the fork you’d end up with only 6 Bitcore. The media has often misrepresented this as “creating new bitcoins,” but that’s not really what this is at all. To date, there are a lot of Bitcoin forks that have happened - some are worth a decent amount of money, some that aren’t. There are more planned, but I’ll list out some of the salient ones that already exist:
- Bitcoin Cash (BTC): Big blocks, no segwit. Worth $2845.70 at the time of this writing.
- Bitcoin Gold (BTG): Changed PoW algorithm to be ASIC-resistant, so that it can be effectively mined with GPUs. Worth $351.46 at the time of this writing.
- Bitcore (BTX): 20mb blocksize with Segwit and Bloom. “Halving” of forked BTC. Worth $16.55/coin at the time of this writing.
Some people call these forks “airdrops” because it’s sort of like someone dropping money in your lap for owning Bitcoin - a sort of dividend. To this end there’s even a subreddit named BitcoinAirdrops which I have found to be a very useful source of information. This is a great place to find out what forks are upcoming and if they’re going to be worth any money. You can also use coinmarketcap to get a rough idea what a particular forked coin is worth.
I’m here to tell you that there is a way to claim your Bitcoin “airdrops”, and it’s not that hard. It’s also, to my knowledge, quite safe as long as you do it right - I went through this process myself and lost nothing. This guide operates from the assumption that you intend to sell your coins for other crypto or perhaps all the way back to fiat - but if you’re only interested in getting access to your coins (and putting them in your wallet) simply skip ahead to the appropriate sections. From this point forward, the guide assumes you are trying to get ahold of your BTG - but this should work for any present or future fork.
Claiming Bitcoin Forks: Basic Strategy
To date I’ve had no problems with the following basic strategy:
- (Optional) Send your bitcoins to a brand new wallet. This is an optional security step, but I highly recommend you follow it. If you haven’t moved your coins since the date of the fork, your old private keys control access to both your bitcoins AND whatever forked coins you are trying to get access to. Moving your bitcoins to a new wallet helps to eliminate any risk of losing your bitcoins at any point in this process.
- (Optional) Create and sign into a Coinbase account. I recommend Coinbase because they are the most straightforward exchange. This is where you will ultimately be selling coins and claiming fiat, if that’s your goal.
- Create and sign in to a Binance account. If you are American, Binance is currently not accepting new American clients - use KuCoin instead. I recommend Binance because they have been reliable and convenient for me and they offer many different lesser-known cryptocurrencies with all sorts of trading pairs. An added bonus is that you can withdraw up to 2 BTC/day worth of funds with no verification at all. Binance has an excellent track record with forks. They’re already working on Super Bitcoin (SBTC) and BitcoinX (BCX) - and best of all, they currently support Bitcoin Gold.
- Download Coinomi onto an Android phone. Don’t have an Android phone? Buy one. You can get a basic model for around $30 these days and use it as a sort of hardware wallet. In my opinion, Coinomi is the safest and most convenient wallet for many cryptocurrencies, and has a track record of supporting Bitcoin forks. They are also extremely security-conscious and, in my own experience, trustworthy. On this step you could try emulating Android instead of buying one, but that’s outside the scope of this guide and I don’t recommend it. Before moving on to the next step, create a Bitcoin Gold wallet in Coinomi.
- Obtain and “sweep” the private keys of each address which contains BTC from your old Bitcoin wallet into your new Coinomi BTG wallet. You now have access to your BTG!
- Send your BTG from Coinomi to your Binance account, then trade them for whatever coin you like. I recommend ETH if you are just trying to turn this back into fiat.
- (Optional): Send your ETH to your Coinbase account and sell them for fiat.
I’d like to point out here that there are, of course, other ways of doing this - this is just what I found to be safe, convenient, and expedient. I understand that hardware wallets like the Ledger Nano S and the Trezor also make accessing forked coins pretty simple, but only if they choose to support that particular fork.
Now, if you’re a power user or someone with some existing familiarity with cryptocurrency, you can probably stop here. The rest of this guide is just going to be a more in-depth description of the preceding steps. If you’re completely new to cryptocurrencies or have never dealt with a fork before, you might be a little lost - that’s fine! You won’t be by the time you finish this guide. I’ll go step by step:
Securing Your Bitcoins
Send your bitcoins to a new wallet. There is actually not much more to say about this step - you basically want to insure that, regardless of any other factors, your Bitcoin is safe throughout the rest of this process. You should do this if you care at all about security. Bitcoin wallets are a little outside the scope of this guide, but if you already have coins in a wallet then you likely already know how to create a new wallet and move coins.
Starting Out On Coinbase
This step can be skipped if you don’t intend to sell your coins for fiat. Coinbase is arguably the most trusted exchange currently on the market. You can think of them as the PayPal of the cryptocurrency world, with all the good and bad connotations that come along with that. There are some countries where this is not the case! For example, in Canada, one would probably want to use QuadrigaCX instead. Unfortunately, that’s outside the scope of this guide, but I may do a country-by-country guide for acquiring coins later.
All you have to do here is go to Coinbase’s website and create an account. Security is incredibly important here - remember, in cryptocurrencies you are your own bank and so it is absolutely crucial that you follow good security practices. This means your password should be strong - and it should be a password you aren’t using anywhere else (including other exchanges). Google has a pretty good guide with some tips on choosing strong passwords. Keeping security in mind, it would also behoove you to turn on two-factor authentication once your account is created.
It is possible to link your bank account to Coinbase and for this purpose I recommend you do this. At the time of this writing Coinbase offers three coins: Bitcoin (BTC), Ethereum (ETH), and Litecoin (LTC). Once you’ve followed the other steps in this guide, you’ll have one of these three coins (likely ETH) and be able to sell them for fiat money using Coinbase.
Binance Beginnings
Now is the time for you to make your Binance account. This is where you are going to trade your BTG for some other coin. Follow the link and create an account using a strong password (this should be different than the one you used for Coinbase!). There are exchanges where you may or may not be able to trade off your BTG (Changelly and Kucoin are two reputable examples). There are other reputable exchanges as well, but be careful about using lesser known exchanges - scams do exist!
This guide focuses on Binance because my experience there has been 100% positive - I have transferred coins in and out of their system many times with no problems.
Once your account is made, you should set up two-factor authentication here via Google Authenticator. It’s safer, and you will eventually need it to transfer coins out of Binance anyway.
Setting Up Coinomi
This guide assumes you have acquired an Android phone of some sort. I recommend you have a phone that you use only for this purpose - no surfing the web, etc. You would then keep the battery out of this phone unless you are actively using it for cryptocurrency.
The reason we are installing Coinomi rather than some desktop wallet is that Coinomi has a very good reputation, is security conscious, and most importantly has handled every meaningful Bitcoin fork to date. Thus, I can reasonably expect this guide to hold up not just for Bitcoin Gold but for any future fork (Bitcoin God, Super Bitcoin, Bitcoin Uranium, Cash Plus, etc.). Most importantly, security is the huge plus here - no one knows how much legitimate wallet support is actually going to exist for some of these forks, and if Bitcoin Gold’s launch is any indicator, scammers are going to be waiting in the woodwork to create all sorts of schemes to try to get your bitcoins. With Coinomi you bypass all that nonsense.
Making a wallet is pretty easy with Coinomi. Once the app is downloaded, simply follow the directions on the screen. Bear in mind that the passphrase it gives you - several random words in a row - is extremely important. You should write this down on a piece of paper and keep it extremely safe and private. Do not type it on your computer or save it anywhere. For all intents and purposes this passphrase is your Coinomi wallet. If your phone is eaten by a pack of rabid badgers tomorrow, that passphrase is all you need to regain access to your wallet and all the different coins in it.
Once the wallet creation steps are done, Coinomi will ask you which coins you’d like to set up individual wallets for. Remember, this is a multi-wallet so it supports many different kinds of coins. Don’t worry too much about this - you can always go back and add more later, so for now just add Bitcoin Gold (or whatever forked coin you are trying to get).
Obtaining and Sweeping Private Keys
This is where things get interesting. Obtaining your private keys is often different for each wallet - this guide is going to assume you are using Bitcoin Core, but if you are using a different wallet, don’t worry. Any wallet should give you some way to get a hold of your private keys - searching around online should quickly give you an idea of what to do.
How Do I Get My Keys From Bitcoin Core?
In Bitcoin Core, the process is pretty straightforward. First, open it up and go into your “Transactions” tab. It looks like this, minus the big red square:
This is everything you’ve ever sent and received. You’ll see I’ve right clicked one of the labels/addresses (where I’ve placed a large red square.) For every single address that held coins at the time of the fork, you should click “copy transaction id” and paste it into a text file. You’ll need them for the next step.
The way Bitcoin works is that every receiving address has a private key associated with it. We need to retrieve these - even if there are no bitcoins in them now, these addresses still control access to the coins on the Bitcoin Gold blockchain. To do this, we’ll start by clicking “Help” and then “Debug Window”. It should look something like this:
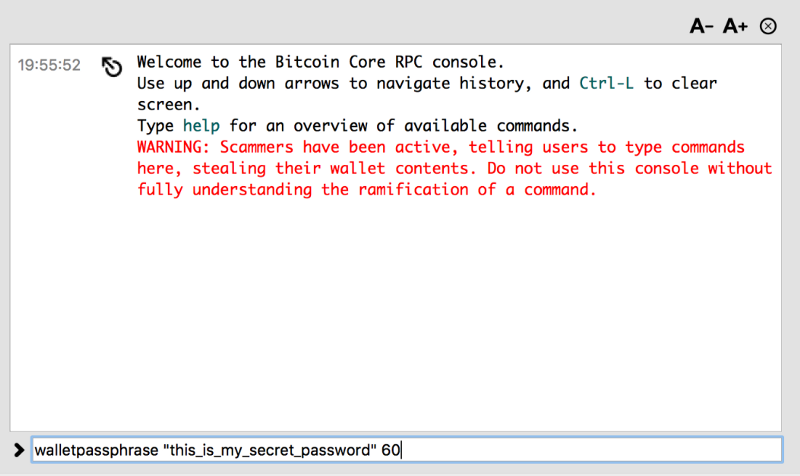
As you can see, you can type commands in the bottom here. As you can see, I have one in there now - the “walletpassphrase” command is going to unlock your wallet so that you can get to your private keys. You’ll only need to do this if you’ve encrypted your wallet with a password. Don’t perform this step on an insecure computer or if anyone is around to see your screen - they’ll see your password! The “60” at the end of this line tells the software to unlock your wallet for 60 seconds.
Next, you’re going to type the following command into the window for every single address that had bitcoins in it at the time of the fork:
dumpprivkey “this_is_my_address”
Instead of “this_is_my_address” you will, of course, put each address. This will dump a private key for the address file onto the screen. Either record these somewhere or leave the screen up - just remember that if anyone gets these, they have will access to your forked coins until you move them, so be careful.
What Is “Sweeping” and How Do I Do It?
Remember your Coinomi account? Pull it up on your phone now, and go into your Bitcoin Gold wallet. Sweeping your keys is as simple as going into the menu/settings and pressing “Sweep wallet”. You’ll have the option of either typing in your address private keys one-by-one, or scanning in QR codes. This is where things get slightly painstaking unless you want to use a QR code generator, which I personally did not. In theory you could paste your private keys into such a generator and scan in the generated codes - if you’re going to do this, make sure it’s on an offline machine in case the generator has malicious code.
In any event, as you proceed with each address you will see the coins from them getting “swept” into your Coinomi wallet. Keep going until all your keys are swept. You now have access to your Bitcoin Gold!
I Have My Bitcoin Gold: Now What?
Well, that depends on what you want to do with it. If you’re like me, you’re not a big fan of BTG and you want to trade it for something more interesting. If you know you want to dump your BTG but aren’t sure which other coin sounds interesting, I have written some overviews of coins like Stellar (XLM), Ark (ARK), and Verge (XVG) which you might find interesting.
If you know what you want to buy, then it’s time for you to use that Binance account we set up earlier. I will save space in this article and direct you to one of the ones I linked a moment ago - look at the “I Sent ETH to Binance - Now What?” step. It is the same here. All you’re doing is trading your BTG for XVG, or whatever other coin you’d like. However, at the time of this writing Binance does not offer direct trading pairs for BTG for anything other than ETH and BTC - so, simply trade your BTG for ETH, then trade your ETH for whatever coin you’d like as per the instructions here. If instead you just want to turn your BTG into fiat, you’d simply stop after trading it for ETH, then send that ETH back to Coinbase in order to sell them.
Summing Up
This guide addresses a more complicated problem than my previous ones, and I hope that this clears up the process and saves people some trouble. As I said in the beginning, I have heard of many people losing coins due to scams, malware, and bad advice —but, if you followed this guide, you should safely have full access to your BTG while taking minimal risks.
Come back soon because more content like this is always coming! If my work helped you or gave you something to think about, share it with others:


Sharing helps more people find my articles, and I’d love to be able to assist as many people as possible with cryptocurrencies. Also, if you have any ideas for future articles or specific questions, I’d love to hear them. One last thing: if you’d like to chat with me in real time, check out my Discord!
Posted: Dec 20, 2017
< Previous Next >